Lab 2 Week 5
Microsoft Word #1
The majority of the exercises in this lab are based on "A Guide to Word
2000" (available from the print room).
<< -- Return Home
Exercise 1: The Setting up and Layout of Microsoft Word
By default when opening Word, a blank new document is created, along with a
default layout.
The Office Assistant:
When Opening up Word for the
first time, the Office Assistant will appear. A single left click will
bring up a search menu to look for help.
After a while, one may want to
turn off the Office Assistant. Do this by "Right" clicking on
the Office Assistant, and selecting "Options". In the Options
dialogue box, uncheck "Use The Office Assistant".
To turn ON
the Office Assistant, go to the "Help" Drop down menu and select
"Show the Office Assistant". |

|
Page Views:
There are four seperate page views, "Normal", "Web
Layout", "Print Layout" and "Outline". Print
Layout gives the best representation of an A4 Page, allowing the borders
of the page to be seen. This particular layout allows the
"Rulers" to be seen along the top and left sides of the page.
See further down for this layout. |
Toolbars:
Toolbars containing shortcuts to commands, such as save, print, bold,
underline, wordart etc, can be switched on or off to save space. In order
to VIEW the toolbars available, do to the View drop-down menu and go to
the toolbars tab. Select the "Standard", "Formatting",
and "Drawing" toolbars.
Toolbars can also be selected by "Right Clicking" on any of the
exisitng toolbars. |
 |
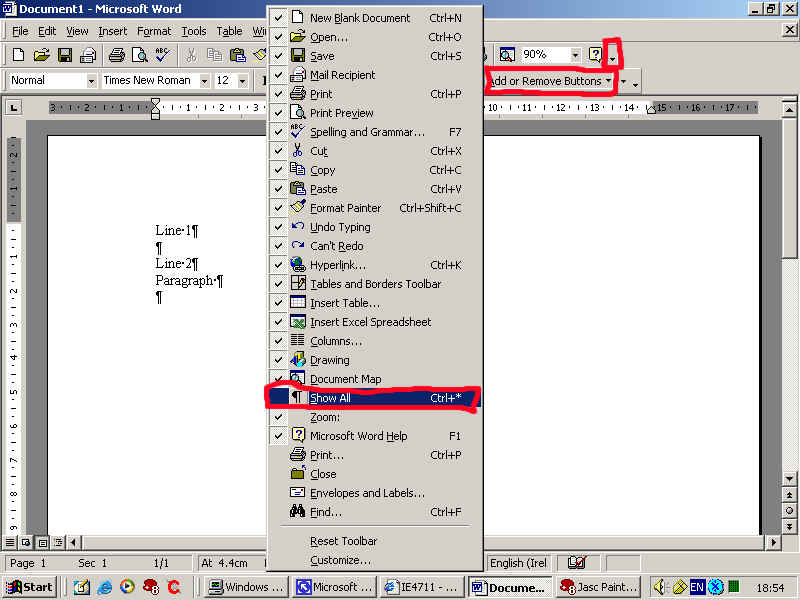
Show/ Hide Formatting Marks:
Between every space, and at the end of every line, special marks are
visible to mark the number of spaces or line breaks that exist in a
document. They can be turned on or off as shown in the picture below: |
Exercise 2: Basic Typing of Text
1. Type the following two lines:
A non breaking space prevents word-wrap from separating words at the end of a line.
Pressing CTRL+SHIFT+SPACEBAR creates a non breaking space.
2. Using the left mouse select the two lines that you have typed.
3. Click the EDIT menu on the menu bar and choose the COPY option.
4. Move the cursor position somewhere below the lines you have typed.
5. From the EDIT menu choose the paste option. (Note what happens)
The above operation can also be carried out using the following keyboard Shortcuts: COPY - CTL+C PASTE - CTL+V
There are 2 other ways that you can copy, cut and paste text what are they?
Another useful feature - if you want to select all the text in a document this can be done easily by
pressing CRTL+A
6. Select the word "creates" by double clicking it with the left
mouse button.
7. Change the font style to BOLD by selecting the B option on the
formattting toolbar.
8. Select the words "breaking space" and change their font styles to Italics.
9. Select the entire two lines and change the size of the font to 14pt.
10. Use the UNDO button to undo the last two changes made to the passage (i.e.
undo to step 7).
11. Use the ZOOM option in the VIEW drop-down menu to enlarge the view to 200%
12. Select the first line of text and change its colour ro red using the font
option in the FORMAT drop-down menu.
13. Change the line spacing to 1.5 lines, by selecting/ highlighting the lines
with the mouse and go to the Paragraph option in the FORMAT drop-down menu. This
can also be done using the Formatting toolbar. Add the Line spacing buttons onto
the Formatting toolbar. (Hint: Similar to the Show/ Hide button for the Standard
Toolbar)
The Majority of Assignments and Essays for coursework
submission are typed in 1.5 (Line and a Half) Line spacing.
14. Close down the current Microsoft Word Document and Create a New Word
Document
15. Type the following passage as it is typed here (font size = 12pt)
(Hint: You will need to use all 4 of the Text Alignment buttons:  .
The 1. and 2. are automatic using the Numbering icon:
.
The 1. and 2. are automatic using the Numbering icon:  .
The two numbered lines will have to be "Indented/ tabbed in from the left
of the page
.
The two numbered lines will have to be "Indented/ tabbed in from the left
of the page

Indenting/ tabbing text can be done using the "Hanging Indents" on the
ruler at the top of the page. The "TAB"  key
can also be used. There are also "tabs" that can be created and placed
along the top ruler to adjust the distance of text in from the left hand side of
the page:
key
can also be used. There are also "tabs" that can be created and placed
along the top ruler to adjust the distance of text in from the left hand side of
the page:  )
)
16. Create a subfolder called idnumber (e.g. 0400000) in C:\WorkArea.
17. Save the Word Document into this folder. The name of the document should be
called "word1".
18. Make changes to the text by:
(i) Inserting new text in the middle of a sentence.
(ii) Removing/ Deleting text. Use the "Delete" key or the
BackSpace key.
(iii) Replacing text. Highlight/ Select text with the mouse and type over the
selection.
(iv) UNDO and REDO changes made to the document.
19. Print Preview the document  and then print
the document
and then print
the document  making sure that the document
prints out correctly.
making sure that the document
prints out correctly.
20. Carry out a "Spelling and Grammer" check on the document. Go to
the "Tools" drop-down menu and select "Spelling and
Grammer".
This should be done automatically as you are typing.
Incorrect spellings are underlined in RED.
Incorrect grammar is underlined in GREEN.
21. Save the document and Close down Microsoft Word.
21. Using My Computer on the Desktop, Copy the Word Document (word1) from
C:\WorkArea\040000\ and PASTE into your Zip Disk.