The majority of the exercises in this lab are based on "A Guide to Word
2000" (available from the print room).
<< -- Return Home
1. Create the following passage using Bullets and Numbering

2. Page Breaks.
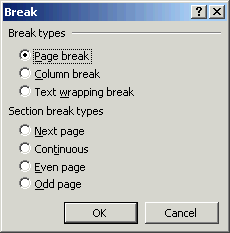
| After the previous list of bullets and numbering insert a "Page Break". Do this by going to the INSERT drop-down menu and selecting "Break". In the dialogue box that appears, select "Page Break". This will move the cursor to a new page. This "Page Break" will keep any new text on a separate new page. Page Breaks are very useful for separating text and pages, making sure text will stay on a particular page. |  |
3. Create the following paragraph of text and indent the text as shown.

4. Section Breaks.
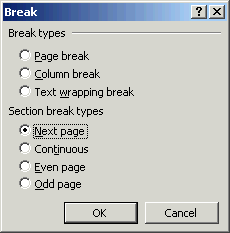
| After the previous paragraph, insert a "Section Break". As well as providing a new page (as with a Page Break), section breaks, separates formatting, indentation, page numbers, page borders and page layouts (i.e. changing from portrait to landscape) between different pages. |  |

3. Insert a new "Section Break" and turn OFF the page border for
this new section.
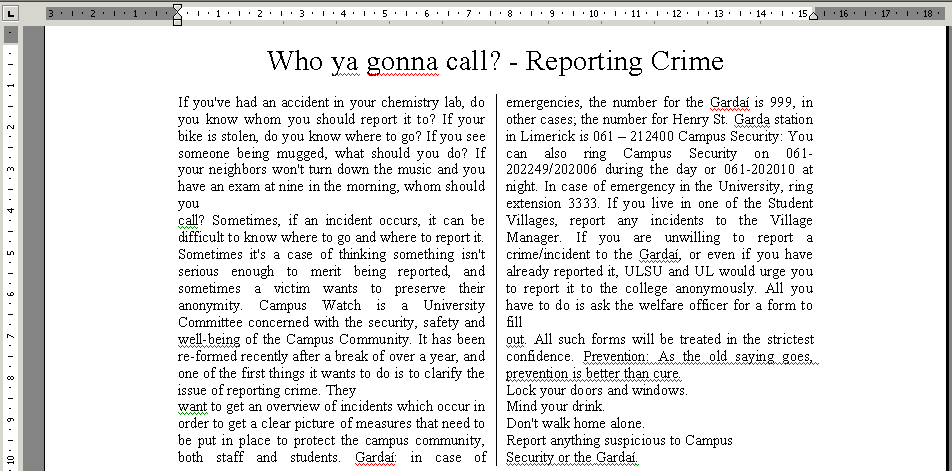
Copy and Paste the following text into Word, and using Columns
(From the FORMAT drop-down menu) create the columns as can be seen in the
picture below.
Who
ya gonna call? - Reporting Crime
If you've had an accident in your chemistry lab, do you know whom you should
report it to? If your bike is stolen, do you know where to go? If you see
someone being mugged, what should you do? If your neighbors won't turn down the
music and you have an exam at nine in the morning, whom should you call?
Sometimes, if an incident occurs, it can be difficult to know where to go and
where to report it. Sometimes it's a case of thinking something isn't serious
enough to merit being reported, and sometimes a victim wants to preserve their
anonymity. Campus Watch is a University Committee concerned with the security,
safety and well-being of the Campus Community. It has been re-formed recently
after a break of over a year, and one of the first things it wants to do is to
clarify the issue of reporting crime. They want to get an overview of incidents
which occur in order to get a clear picture of measures that need to be put in
place to protect the campus community, both staff and students. Gardaí: in case
of emergencies, the number for the Gardaí is 999, in other cases; the number
for Henry St. Garda station in Limerick is 061 – 212400 Campus Security: You
can also ring Campus Security on 061-202249/202006 during the day or 061-202010
at night. In case of emergency in the University, ring extension 3333. If you
live in one of the Student Villages, report any incidents to the Village
Manager. If you are unwilling to report a crime/incident to the Gardaí, or even
if you have already reported it, ULSU and UL would urge you to report it to the
college anonymously. All you have to do is ask the welfare officer for a form to
fill out. All such forms will be treated in the strictest confidence.
Prevention: As the old saying goes, prevention is better than cure.
Lock your doors and windows.
Mind your drink.
Don't walk home alone.
Report anything suspicious to Campus
Security or the Gardaí.

4. Headers, Footers and Page Numbers
At this point, you should have a 4 page document. If you did not manage to
insert Section Breaks or Page Breaks correctly, you will need to correct these
before carrying out these steps.
Hint: To See if Section and Page Breaks are correctly
inserted, CLICK THE SHOW/ HIDE button ![]()
Headers and Footers are obtained from the
"VIEW" drop-down menu.
(I) Insert the following as a Header on the last two pages of this document
only:
"IE4711/
MF4711
Manufacturing
Integration
Autumn 2004"
(II) Insert the following as a Footer on the last two pages of this document
only:
"Advanced Microsoft Word"
(III) Insert ROMAN Numerals on the first two pages, with Numerical numbers,
beginning from 1 on the third page.
"Page Numbers" are obtained from the
"INSERT" drop-down menu.
SEE the Document HERE >>>
5. Page Layout and Orientation
On the third page, (with the page border), change the Page Orientation from
Portrait to Landscape.
Do this by going into "Page Setup" from the FILE drop-down menu.
Result: This Page on its own, should be in Landscape with the pages previous and
after remaining in Portrait.
SEE the Document HERE >>>
In "Page Setup" adjust the Top, Bottom, Left and Right Margins to
the following sizes:
Top = 25mm, Bottom = 30mm, Left = 25mm, and Right = 20mm.
Normally, more room is left on the Left Margin to allow
room for Binding!!
6. Insert a Footnote providing extra information about a sentence of your
choice in the document. Do this by placing the cursor at the end of the
sentence you wish to enter a note regarding, and from the INSERT drop-down menu
select "Footnote". An Example can be seen below:

7. Styles
Styles are predefined text formatting which can be applied to a Heading, or
section of text very quickly.
In the previous document, put the following Headings on each of the pages:
Page 1 - "Section 1: Bullets and Numbering"
Page 2 - "Section 2: Paragraph Alignment"
Page 3 - "Section 3: Inserting Tables"
Page 4 - "Section
4: Inserting Columns"
Each of these Headings must have the following format: 14pt, Font: Arial, Bold,
Italics.
Instead of having to carry out all of this formatting for each heading, a
"STYLE" is created.
Create a Style for this Heading, having all the formatting as outlined
previously.
Go to the FORMAT drop-down menu and select
"Style". An existing "Heading 1" can be
"Modified", or a "New" one can be created. Modify the
existing "Heading 1" to have the formatting previously outlined.
Inside the Modify dialogue box, select the "FORMAT" tab at the bottom.
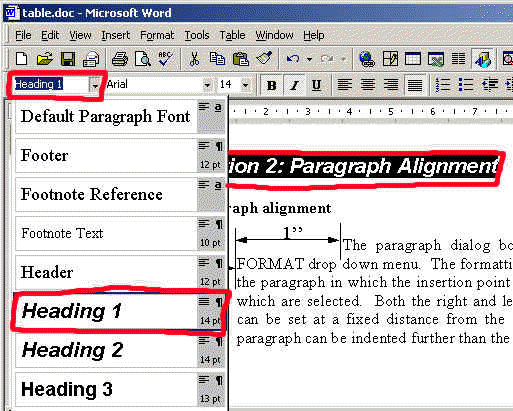
When the style is modified, select the Heading, e.g. Section 1:......." and
select Heading 1 from the Style drop-down menu, as can be seen below:

8. Table of Contents
If all of the headings are created using STYLES as outlined previously, a TABLE
OF CONTENTS will be AUTOMATICALLY generated for you.
(I) Go to the very beginning of the document and insert a Page Break, to give a
blank first page. On this Page type in the Heading "Section 0: Table of
Contents". On a new line below this heading, change back to
"NORMAL" in the style drop-down menu.
(II) Go to the INSERT drop-down menu, and select "Indexes and Tables".
Select the "Table of Contents" tab at the top. Click OK for the Table
of Contents to be created.
A complete Table of Contents is created using the headings put into the STYLE
"Heading 1" earlier, along with the corresponding page number. In
order to UPDATE the Table of Contents, Right-Click on the Table of Contents, and
go "Update.."
You will also notice, that the Table of Contents is
click-able with the left mouse button and will act as "HyperLinks" as
on the Internet.
See the Completed Document HERE >>>>
9. A Table of Figures can be inserted, if there are several pictures/ figures in a document. This is done, by creating a STYLE, and a heading such as "Figure 1" and applying this STYLE to the description of the Picture.