Lab 4 Week 7
Microsoft Excel #1
The majority of the exercises in this lab are based on "A Guide to Excel 2000" (available from the print room).
<< -- Return Home
Opening and getting to know Microsoft Excel:
1. The Office Assistant may Appear as with Microsoft Word. To Turn off the
Office Assistant = Right-Click on the Paper Clip and go to Options, unclick
"use the office assistant".
2. The basic layout of Excel can be seen below:
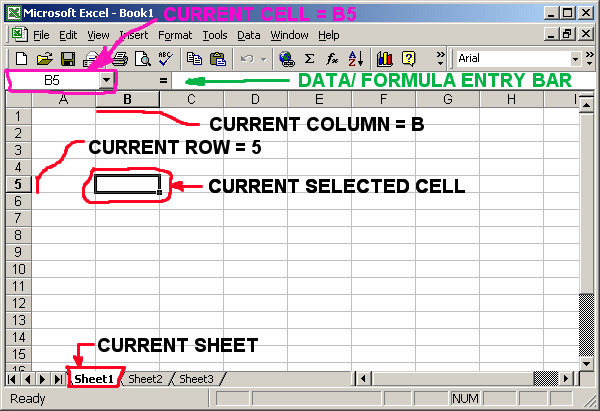
Make Sure you know the basic layout of Excel as outlined above. If not, go over
the Notes
"A Guide to Excel 2000" again!
Exercise 1: Formatting an Excel Worksheet
In order to Download the unformatted Excel Document, "MAP" the
following "NETWORK DRIVE":
\\europa\ie4711
Open the file "lab_4.xls" in the Lab_4 SubFolder.
Make Sure to go to the FILE drop-down menu, and click
"Save As" into your WorkArea
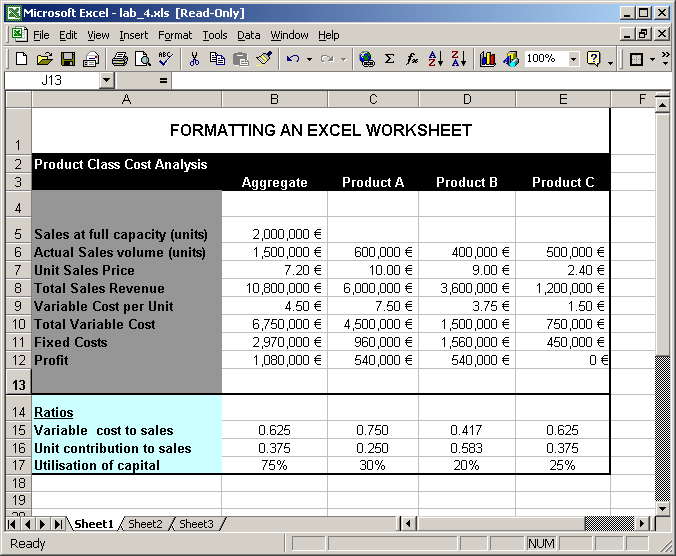
Carry out the Following Steps to obtain the final formatted document, as
can be seen below:
1. Increase the width of Columns A, B, C and D so that you can easily view all
the data in the cells.
2. Examine the following cells: B7, B9, B11, B14, B15, and B16. Note the
formulae used. Look at the Formula in Cell B16 - ( B5/$B$4 ) This is called
Absolute Referencing. Search for 'Absolute Referencing' in Help. (Press F1 key
on keyboard for Help)
3. Copy the formulae in cells B7, B9, B11, B14, B15 and B16 across into columns
C, D and E, to provide automatic solutions for Products A, B and C. Examine
cells C16, D16 and E16. Because $B$4 was absolutely referenced, this reference
is not automatically incremented when formulas are copied.
4. Format the document to look like the picture below. Use decimal points, €
symbols, x,xxx,xxx - thousand mark ticks, percentages, colours, borders etc.
5. Insert a New Row above the "Product Class Cost Analysis".
6. Type in the text "FORMATTING AN EXCEL WORKSHEET" above the Table,
and format the text and cells as can be seen below.
Hints: For the text "FORMATTING AN EXCEL
WORKSHEET", highlight all of the appropriate cells, RIGHT-CLICK and go
FORMAT CELLS. Click on the "Alignment" tab to change the properties.
If you see '#######' in any of the cells, then you need to increase the
width of the cell to display all the numbers.
NOTE: Do NOT ATTEMPT to type in any of the
numbers in Columns C, D or E.
Exercise 2: Calculating Depreciation
Depreciation shows the wear and tear cost to a business on the assets it owns.
This cost tends to vary from year to year, depending on the method of
depreciation used. The method used here is the declining balance. This is
similar to the concept of compound interest, except that it is reducing in value
all the time.
EXAMPLE ONLY:
Asset = Car
Cost = 1000
Number of Years of Life: 3
Rate of Depreciation: 10%
| Year |
Depreciation |
Cumulative Depreciation |
Net Book Value |
| 1 |
100 (1000 * 0.1) |
100 |
900 (1000 - 100) |
| 2 |
90 (900 * 0.1) |
190 (100 + 90) |
810 (1000 - 190) |
| 3 |
80 (810 * 0.1) |
271 (190 + 81) |
729 (1000 - 271) |
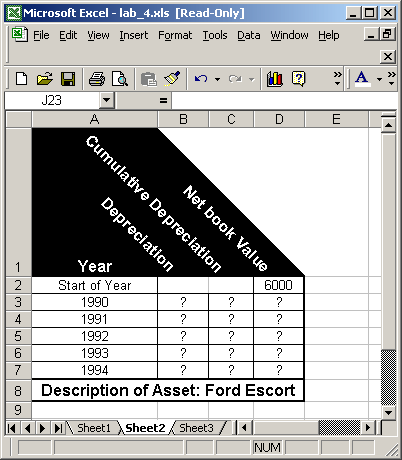
1. Setup a new WorkSheet (Sheet 2) using the information below. Use the appropriate
formula calculate the depreciation of the Asset:
Asset: Escort
Year: 1990
Years: 5
Cost: € 6000
Rate: 23.89%
2. Display the results in a table similar to the one below. Make sure to enter
all the appropriate formula. Replace the ? marks with appropriate formulae.
3. Save the Excel Document as Excel 1.xls.
4. Close down Excel.