1. Setting up a Drawing Template (*.drwdot) and a Sheet Format (*.slddrt)
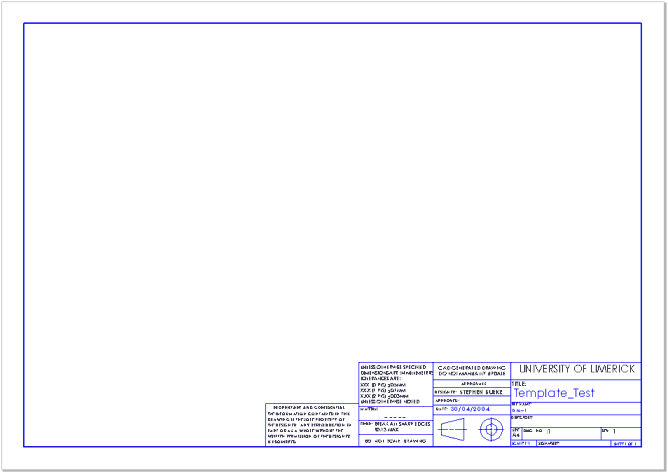
Below is a typical Sheet Format for a SoldiWorks Drawing. Note the Date,
Title, Sheet, Scale are automatically generated by SolidWorks, using the
'Link to Properties' option in the properties of a 'Note'.
Seperate Sheet
Formats (Titleboxes) must be made for the following:
- A4 Landscape, First-Angle Projection
- A4 Portrait, First-Angle Projection
- A4 Landscape, Third-Angle Projection
- A4 Portrait, Third-Angle Projection
Method used to set-up Template:
- Open up soldworks.
- Choose a new Drawing from the 'Templates' tab
- Select an A4 Landscape/ Protrait format from the initial dialogue box. (If this does not appear, look at step 9)
- SolidWorks default template and titlebox should appear.
- Go to the 'Edit' drop down menu and go edit "Sheet Format", upon which the titlebox and border should appear in blue, as below.
- Zoom out, drag a box around all of the sheet and delete all the details.
- Use Grid and Snap to create a new titlebox and border
- When the titlebox and border is created, go to the 'Edit' drop down menu, and go edit "Sheet", upon which the blue lines and details should go greyed out. (Note, dont worry if they dont, the main point is that when "editing" the "sheet" the border and titlebox can not be selected.
- Right Click on the Sheet and go "Properties". The method of projection can be changed to First or Third Angle projection. The overall scale can be adjusted. If no dialog box appeared in Step 2, then an A4 Landscape/ Protrait sheet can be selected.
- Before saving the Sheet Format and the Drawing Template, the dimensioning style must be changed. Go to the "Tools" drop down menu, and select "Options". At the top of this large dialog box, select the "Document Properties" tab. On the right pane of this window, the BSI standard can be selected in the first drop down selection. On the second item on the list on the left pane, "Dimensions", one MUST turn OFF "Add Parentheses By Default", otherwise having this on, will put brackets around manual dimensions created. Also, change the arrow heads, to be solid filled.
- Save the Sheet Format (Titlebox and Border) go to the "File" drop down menu, and go "Save Sheet Format".
- Save the Drawing Template (A4 landscape, first-angle properties, and dimension style) go to the "File" drop down menu, and go "Save As", and select "Drawing Template (.drwdot) in the "save as type" option.
- When restarting solidworks, the program must be told where the templates are located. Go to the "Tools" drop down menu and go to "Options". In the "System Options" tab, choose "File Locations" and click "ADD" to add in the folder where your templates are saved.
- Look at the Video File of this Exercise on the previous page. (Click "Return" at the top of this page)
(Note, Third Angle projection need not be used for submitted assignments,)
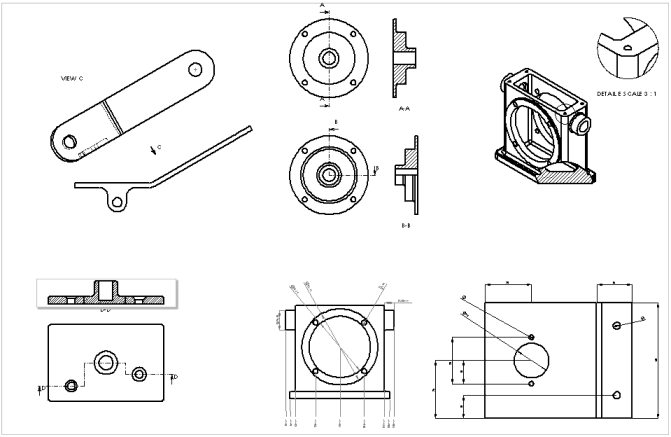
Basic Drawing Question:
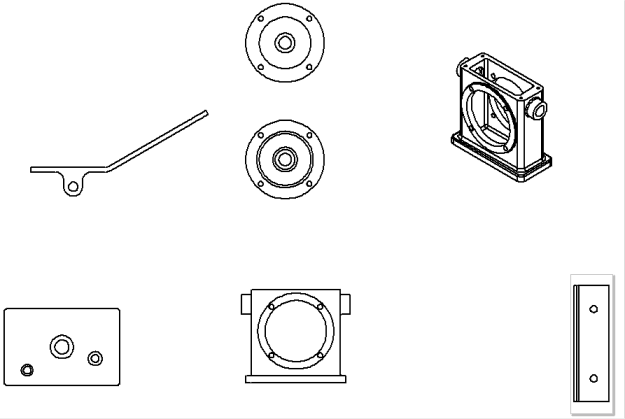
Solution to the above drawing: