 On my work computer I have Windows 7 Professional. I was creating Administrative Images and testing software installation, and wanted a new blank Windows installation (any version) to test on. I use vmware quite a bit on my home PC, but I didn’t have a XP key or CD handy. Bring on Windows XP Mode.
Go to http://www.microsoft.com/windows/virtual-pc/download.aspx
Follow the 3 Steps outlined on the above website. One of which is a 480MB download of WinXP. (Note: Windows XP Mode is only officially available for Windows 7 Professional and up.) Within a few minutes Windows XP will be running inside Windows Virtual PC. All integration tools will be installed. The XP virtual machine will have Local Disks mounted from the Host Windows 7 computer, and it will have networking all setup.
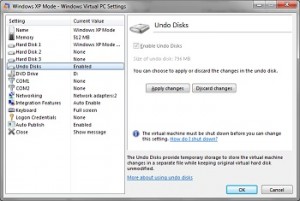
Looking more into things, I found and enabled “Undo Disks” which was just what I needed. (Browse to : C:\Users\$username\Virtual Machines\Windows XP Mode.vmcx, and right-click and go settings). It’s a little more basic than vmware which lets you take snapshots, but it works.
Apart from testing Administrative installs etc. the possibilities are endless. It could even be used to test website designs in IE6.
The biggest plus with Windows XP Mode was that a fully activated genuine copy of Windows XP was installed within minutes.
I did give it a go installing on a Windows 7 Home Premium version, following this guide. It installed, however it did not activate correctly (after many attempts, even entering a correct XP key) due to Windows 7 Home edition, but it left me with the 30 day trial period, which combined with undo disks, will suffice.
== Instructions on installing Windows XP Mode (unactivated) on Windows 7 Home ==
1.Download and install Windows Virtual PC .
2.Download XP Mode (just select Windows 7 Ultimate and the desired language in the drop down boxes)
3.Install the pre-configured and pre-activated XP Mode. During installation, the following error will occur on Windows XP Mode Home Basic and Premium edition:
 Windows XP Mode cannot be set up. Windows XP Mode is not available on this edition of Windows
4. You are not using the correct version of Windows 7 to install Windows XP Mode. Please click this link to upgrade.
 Navigate to the folder: C:\Program Files\Windows XP Mode\
5. Take ownership and grant full control permissions to the Windows XP Mode base.vhd file.
6. Right click on Windows XP Mode base.vhd file, then select Properties. Uncheck theRead-only option.
7. Start Windows Virtual PC from Start Menu (Start -> All Programs -> Windows Virtual PC -> Windows Virtual PC)
8. Click Create Virtual Machine at the command bar.
9. Name the new virtual machine as Windows XP Mode or any other preferred name.
10. Continue the new virtual machine creation wizard, until 'Add a virtual hard disk' window. Choose the Use an existing virtual hard disk option, then click Browse to select the location of Windows XP Mode VHD (e.g. C:\Program files\Windows XP Mode\Windows XP Mode base.vhd).
11. Finish the create new virtual machine wizard.

