Build & Manage Websites with Dreamweaver Templates

How do you handle common elements of a webpage across a number of pages? (e.g. Navigation, Header, Footer areas etc) How do you update the header or footer area of every webpage in a website?

  • PHP Includes
  • SSI Includes
  • Manually with Copy and Paste
  • Use Dreamweavers Template Functionality

I’ve been paying more attention to wappalyzer (plugin to firefox) which detects CMS, frameworks and other web technologies, and have found that quite a few websites use Dreamweavers Templates to manage their websites.

PHP Includes

I am a big fan of using PHP Includes to manage websites where there were common elements, such as a Header, Navigation and Footer. There are advantages and disadvantages. The main disadvantage in developing a website for someone is that they would have to be familiar with PHP Includes, and be able to edit the separate files in a text editor (or a Live View option). While a lot of websites use CMSs such as wordpress to manage their websites, people do not realise that these systems need to be regularly updated and maintained.

<?php
 //Require Custom Functions to Print Aspects of the Pages.
 require("config/functions.php");
 //Print Top Nav. Send in the Name of Page for Title.
 print_top('Title of Page','Meta Description','Meta keywords');
?>
<!-- Begin Main Content Here -->
<h1>Home Page</h1>
<p>Main Content Here..</p>
<!-- End Main Content Here -->
<?php
 print_footer();
?>

There are a lot of advantages in having a static website which can be easily edited, managed and updated. Large websites use enterprise level web publishing software (RedDot) which can output static html files.
Using Dreamweavers Template functionality, you can achieve the same.

How to recognise a Website built with a Dreamweaver Template

Looking at the html source of a webpage will reveal the dreamweaver template codes.

html source of a webpage using a Dreamweaver Template

<!-- InstanceBegin template="/Templates/2011.dwt" codeOutsideHTMLIsLocked="false" -->
....
<!-- InstanceBeginEditable name="head" -->
....
<!-- InstanceEndEditable -->

Manual Setup of a Dreamweaver Template

As I prefer doing coding in a text editor, below is the before and after code required to create a dreamweaver template.

1. Create and develop your index.html as normal. (view file)
2. Make a copy of index.html and rename it to mytemplate.dwt
Edit the DWT file and add in the following around the
changeable head elements:
<!-- TemplateBeginEditable name="head" -->
<!-- TemplateEndEditable -->

and add the following around the changeable main content:
<!-- TemplateBeginEditable name="maincontent" -->
<!-- TemplateEndEditable -->
(view file)
3. Edit the index.html file to look like:
<!-- InstanceBegin template="mytemplate.dwt" codeOutsideHTMLIsLocked="false" -->
<!-- TemplateBeginEditable name="head" -->
          <meta name="Keywords" content="websites, design " />
          <meta name="Description" content="Example home page" />
          <title>Stephen's Home Website</title>
<!-- TemplateEndEditable -->
<!-- TemplateBeginEditable name="maincontent" -->
          <h1>Welcome to the Home Page</h1>
          <p>This is a paragraph of text on the main home page</p>
<!-- TemplateEndEditable -->
<!-- InstanceEnd -->
(view file)
4. In Dreamweaver, with the above index.html open,
Modify (drop-down menu) -> Templates -> Update Current Page
This will update the index.html and show all of the code.
The code in the header, navigation and footer will be gray, and you can't edit it.
You can however edit the title and meta head sections and main content area.
(view file)

Manual Setup Workflow

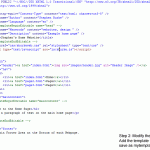
Step 1

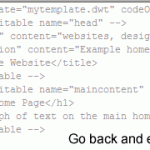
Step 2

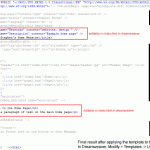
Step 3

Step 4

Setup of Dreamweaver Template (GUI Method)

The previous method outlined the exact Dreamweaver Template codes, which you can insert manually. It’s not the most ideal method, as Dreamweaver has tools for creating and setting up templates, and it doesn’t add that much extra bloat.

A “site” must be setup in Dreamweaver to allow you to create and update templates easily.

As there are a few steps involved, a video has been created showing the key elements.

Advanced Components of Dreamweaver Templates

If you have “Sub Navigation” menus, you can do a conditional include on pages which require a specific “sub navigation” or other element.

Optional Region

Example: There are a number of “product” webpages, and you want to show a common Sub Navigation on these pages.

//Open the mytemplate.dwt file in Dreamweaver.
//Go to the area (outside of a editable region) and add the following.
//(Use floats and css to position)
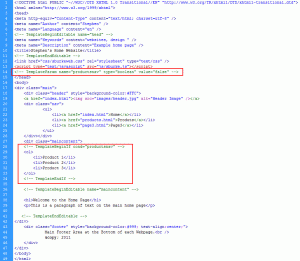
 <!-- TemplateBeginIf cond="productsnav" -->
     <ol>
      <li>Product 1</li>
      <li>Product 2</li>
      <li>Product 3</li>
 </ol>       
 <!-- TemplateEndIf -->
//In the main head area, add the line:
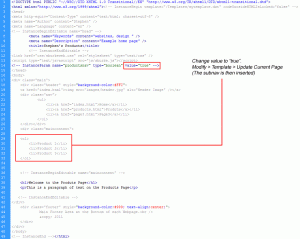
<!-- TemplateParam name="productsnav" type="boolean" value="false" -->
//Choose to update all pages. By default it is "false" so no sub nav
//will be inserted into any pages.
//Open the html page you want the subnav on.
//In the head config line, change to:
<!-- TemplateParam name="productsnav" type="boolean" value="true" -->
//Update the current page (Modify > Templates > Update Current Page

Optional Area for SubNav in the DWT

Products Page with Optional Nav Element


Making Changes to the Template and updating all Webpages

Of course the real benefit of using Dreamweaver Templates is when it comes to making changes. A dreamweaver site should be setup/defined as this will make things much easier (The above video goes through this.).

  1. Open the mytemplate.dwt file.
  2. Modify (drop-down menu) > Templates > Update Pages…

Other Resources

There are actually a ton of resources available on Dreamweaver Templates. The above does not cover all capabilities of DW’s templates. Check out other tutorials on dreamweaver templates.

Posted in Web Development | Tagged , , , , | 7 Comments

Backup with SyncToy

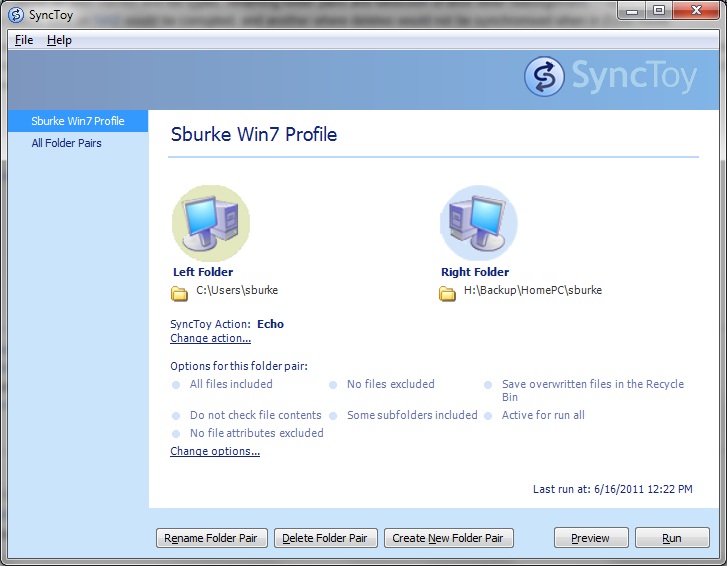
Left to Right
(all files are copied from the Folder on the Left, to the Folder on the Right)

SyncToy Screenshot. Changes are copied from Left to Right

  • Synchronize: New and updated files are copied both ways. Renames and deletes in one folder is repeated on the other.
  • Echo: New and updated files are copied left to right. Renames and deletes on the left are repeated on the right.
  • Subscribe: Updated files on the right are copied to the left is the file name already exists on the left.
  • Contribute: New and updated files are copied left to right. Renames on the left are repeated on the right. Similar to Echo, except there are no deletions.
  • Combine: New and updated files are copied both ways. Renamed and deleted files are ignored.

I’ve been using SyncToy for doing some occassional backups on a Windows pc. It just works.

Download SyncToy

Posted in IT | Tagged , , , , , | Comments Off on Backup with SyncToy

WordPress: Caching, Internet Bots and Database issues

WP Supercache works very nice and has a lot of config options including a preload to cache all wordpress pages. One of my blogs however recieves average traffic and that coupled with the fact that I use tla, I didn’t want to use the preload option. The problem was that a lot of (malicious spamming) bots hit the blog very infrequently and requested 10’s of pages in a second. This caused lots of mysql-slow queries and other database related issues and caused an OOM before on my VPS.

While there are a number of solutions and approaches, below is the one I have taken and proves to be very reliable.

Solution to malicious bots hitting wordpress blogs and preventing mysql issues

The blog in question had its own mysql database and as a result I could limit the number of simultaneous mysql connections made by the blog.

mysql -u root -h localhost -p
mysql> show grants for myblog@'localhost';
mysql> grant usage on myblog.* to myblog@'localhost' with max_user_connections 5;

To test this, I opened 20 tabs in Firefox and went to a different page of the blog. I cleared the wp-supercache, logged out, and then right-clicked on one of the firefox tabs and went “refresh all”. All 20 tabs reloaded the different blog pages and posts. On some of the tabs I seen “Error establishing database connection”. This showed that the max_user_connections setting worked.

To test: Reload all open Tabs in Firefox

Wordpress default Database Error dialog

Custom MySQL Database error for WordPress

So on the rare occassion of a genuine reader seeing the “Error establishing a database connection”, I wanted a more friendly error with a retry option. Digg and twitter all have their own custom errors to cover such a scenario.

Digg's Custom Error Page

Twitter's Custom Error Page


Fortunately wordpress has this already thought of this and has a special page which it can show if it fails on a database connection.

Location of Script: /wp-content/db-error.php

In my custom db-error.php script I do:

  • Send a 503 Service Temporairly Unavailable (so search engines will not index the error page, and will recrawl the site again)
  • Send an email to me so I can monitor how many of these errors occur
  • Show a logo, some text, and a retry link.

<?php
header('HTTP/1.1 503 Service Temporarily Unavailable');
header('Status: 503 Service Temporarily Unavailable');
mail("youremail@email.com","Blog DB Error","There is a problem with the db!","From: yourblog@email.com");
?>
<!DOCTYPE HTML>
<html dir="ltr" lang="en-US">
<head><title>503 Service Temporarily Unavailable</title></head>
<body style="width:600px;margin:auto;margin-top:50px;">
<img src="http://yourblog.com/logo.jpg" />
<h1>Looks like we're getting a lot of database requests.</h1>
<p><a href="javascript:location.reload(true)">
Click to refresh and try load the blog again.</a></p>
</body>
</html>

Of course all going well, most users will recieve a wp-supercached page. This above is for internet bots who hit the blog 10’s and 100’s of times in the space of a second. I can also watch the email messages with the errors and verify the IP of who triggered it. I can then raise max_user_connections as needed to give more resources to the blog db without it overloading all of mysql on my VPS.

Note: this won’t affect google bot or any other genuine bots or web crawlers. It’s primarily aimed at bots who hammer wordpress blogs with many referrer URLs.

Posted in IT, Web Development | Tagged , , | 2 Comments

Installing and Updating WordPress with SVN from the Linux CLI

I’ve been using wordpress since the early 2.x releases. One thing that used to get me down was having to apply all the updates to wordpress as they were especially frequent in 2.x release. While wordpress has an automatic update option now, it only uses FTP or SFTP. I only use SCP over SSH myself for uploading and storing files to my VPS.

SVN however provides a very easy method to install and update your wordpress blog. While there are SVN applications such as tortise svn, I do a lot of SVN using the CLI.

Initial Install of WordPress

mkdir ~/public_blog
cd public_blog
svn co http://core.svn.wordpress.org/tags/3.1.1 .

Update WordPress from SVN to the latest version

cd ~/public_blog
svn sw http://core.svn.wordpress.org/tags/3.1.2 .

Notes

If you want to see the latest available version of wordpress, browse directly to http://core.svn.wordpress.org/tags/Then if there is a later version available use the svn switch (sw) command above.

Further Information

http://codex.wordpress.org/Installing/Updating_WordPress_with_Subversion
http://codex.wordpress.org/Using_Subversion
http://mark-kirby.co.uk/2008/how-to-install-wordpress-using-ssh-and-svn/

Posted in IT, Web Development | Tagged , , | Comments Off on Installing and Updating WordPress with SVN from the Linux CLI

Quick Disk Benchmark for Windows (no setup required)

For a quick benchmark of a local disk, or network share on a Windows computer, there is a small application you can use. It requires no installation or setup. Just download, run the exe, and click “Start”. Wait a few minutes and you will have the Read and Write speeds listed in Megabytes.

The application is called ATTO Disk Benchmark (bench32.exe). While it is an old application, it had worked perfectly for me on all Windows installs, x32 and x64. I tried using newer versions, however they didn’t seem to like testing a Network drive (via Mapped Network Drive). The v2.34 version to which I have linked here does work OK with Network Drives.

When people think that working across a network with large files should be fine, I get them to run this Disk app which shows clearly the difference between local hard disk speed and the read and write speed across a network.

Note: The Disk Benchmark utility uses MegaBytes. This is not to be mixed up with MegaBits. If a computer is connected to a Network at 100Mbps (the small b, means bits and not Bytes). Divide Mbps (megabits per second) by 8, to get MB/sec (megabytes per second).

Click here to download the Archive Download Link (64kB .exe file)
Try downloading it and seeing how fast your Local or Network disks are.

Sample Results

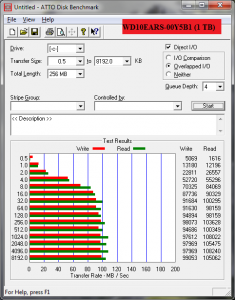
The disk benchmark tool starts reading and writing small files, and progresses to reading and writing larger files. Lots of small files takes longer to read and write compared to one single large file for example.

ATTO Disk Benchmark results on Western Digital 1TB Hard Drive - Medion 8855

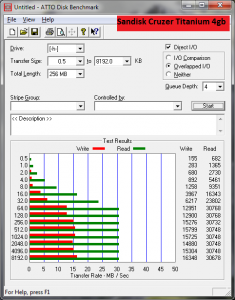
ATTO Disk Benchmark results on SanDisk Cruzer 4GB USB Key

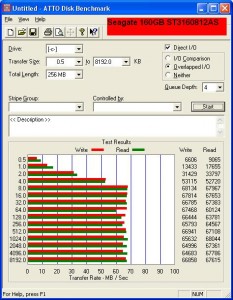
ATTO Disk Benchmark results on Seagate 160GB ST3160812AS - Dell 390

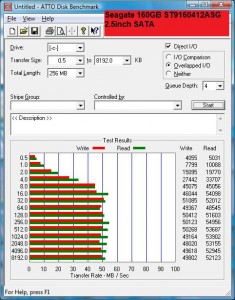
Disk Benchmark results on Seagate 160GB ST9160412ASG 2.5inch - Dell M6500

Posted in IT | Tagged , , , , , , | 3 Comments